School Branding Blog
From Logo to Costume: How to Design a School Mascot That Works in Every Format

Related: Mascot Costume Construction Process • Complete Mascot Design Guide • Game Day Mascot Deployment Strategy • Mascot Logo Design Service • Mascot Costume Service
TL;DR
Not every mascot logo works as a costume. The difference between a design that translates beautifully to 3D and one that requires expensive rework comes down to technical decisions made at the logo stage: silhouette clarity, color count, detail scale, and proportional balance. This guide covers the exact specifications we use after 200+ mascot projects so your design works on a gym floor, a t-shirt, AND inside a costume.
The Problem Nobody Talks About
Schools spend months perfecting their mascot logo. The committee picks a design everyone loves. The files look incredible on screen. Then someone says, “Now let’s get a costume made.”
And that is when problems start.
The costume builder looks at the design and comes back with bad news: the fine line work in the logo cannot be replicated in fabric. The gradient shading that looks beautiful on screen is impossible to reproduce in foam and fur. The proportions that work perfectly at 3 inches wide look wrong when scaled to 6 feet tall. The 14 colors in the illustration would triple the production cost.
We have seen this scenario play out dozens of times with schools that come to us after working with a designer who created a gorgeous logo with no thought for how it would translate beyond the screen. The result is always the same: expensive redesign, delayed timelines, and a costume that does not match the logo the community already fell in love with.
The fix is simple but requires planning from day one. Design the mascot with every application in mind from the start—logo, costume, signage, spirit wear, digital—so nothing falls apart when you move from one format to the next.
Why Logo-First Design Fails
Most graphic designers think in two dimensions. They create mascot logos the same way they would design any illustration: maximum detail, complex shading, and colors optimized for screens. The result looks stunning in a presentation deck.
But a mascot is not a logo. A mascot is a brand system that must work across radically different physical constraints:
| Application | Constraints |
|---|---|
| Logo on screen | Unlimited colors, any level of detail, precise gradients |
| Gym floor paint | 4-6 color maximum, no gradients, must read from 50+ feet |
| Spirit wear | Screen print = 6 colors max, embroidery = simplified shapes only |
| Vinyl banners | High contrast needed, fine details disappear at distance |
| Mascot costume | Foam sculpting, fabric appliqué, 3D proportions, performer visibility |
A design optimized only for screen viewing will fail in at least three of these five applications. That means rework, additional design fees, and inconsistency across your brand touchpoints.
The professional approach is to design for the most constrained application first and then add detail for less constrained formats. In practice, that means designing with costume construction and gym floor visibility in mind from the start. If a design works as a costume and reads clearly from the bleachers, it will work everywhere else.
The 7 Technical Principles of Costume-Ready Design
After managing 200+ mascot design and costume projects, we have identified the specific design decisions that determine whether a logo translates to a costume or not.
1. Silhouette Clarity
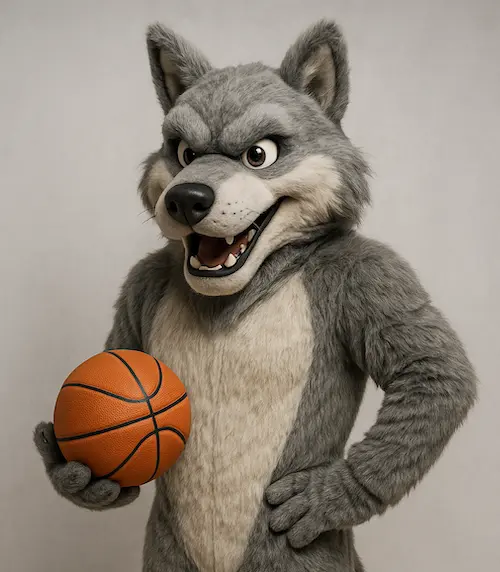
The single most important factor. If you fill the mascot design with solid black, the outline alone should be instantly recognizable as your character. A hawk should read as a hawk. A bulldog should read as a bulldog. No guessing.
Why this matters for costumes: a performer in a mascot suit is seen from 20 to 200 feet away, often in motion, often in poor lighting. The audience identifies the character by its silhouette before they see any color or detail. If the silhouette is ambiguous, the costume fails to connect—no matter how well it is built.
Test it: Print the design at 1 inch wide in solid black. Can you immediately tell what animal or character it is? If not, the silhouette needs work before anything else.
2. Proportional Exaggeration
Mascot designs that work as costumes use exaggerated proportions: oversized heads (typically 25-30% of total height), large expressive eyes, simplified hands, and a slightly top-heavy build. This is not a style choice—it is a technical requirement.
A human wearing a costume adds roughly 4-6 inches to the head, narrows the field of vision, and changes how proportions read from a distance. If the original design uses realistic proportions, the costume will look like a person wearing an animal head. With properly exaggerated proportions, it looks like a character that happens to move like a person—which is the entire point.
The ratio: Head should be roughly 1/3 the total character height in the logo design. This translates to approximately 1/4 when built as a costume (since the body gains height from shoes, padding, and performer stance).
3. Color Discipline
Every color in the logo adds cost and complexity to the costume. Gradients are nearly impossible to replicate in fabric. Subtle tonal variations disappear at any distance.
The target: 4-6 solid colors maximum, with clear boundaries between each. Your school’s primary color, secondary color, one accent, plus black and white for contrast. That is usually enough.
Schools often push for more colors in the logo phase because it looks richer on screen. But those extra colors create cascading problems: the costume requires more fabric types, the gym floor painter charges per color, the screen printer adds per-color fees, and every vendor interprets the “extra” colors slightly differently—leading to inconsistency.
The discipline: If a color does not serve a structural or identification purpose, remove it. The mascot should be recognizable in your school’s core 2-3 colors.
4. Detail Scale
Fine details that look impressive at logo scale—individual feather barbs, whisker textures, fur grain patterns, intricate pattern work—cannot be reproduced in foam, fabric, or paint at costume scale.
The rule of thumb: if a detail is smaller than a quarter when the design is printed at 8.5 x 11 inches, it will not survive translation to costume, signage, or spirit wear. It will either be invisible, look like a smudge, or require hand-painting that adds weeks and thousands of dollars to production.
Design with bold, confident details instead. Large eyes with clear pupils. Simple but expressive eyebrows. Strong jaw lines. Defined muscle groups rather than anatomical accuracy. These details read clearly at every scale from a 1-inch embroidery to a 7-foot costume.
5. Expression and Personality
A mascot costume cannot change its facial expression. Whatever expression is built into the head is the expression for every appearance—pep rallies, sad losses, community events, kindergarten visits. The design must choose one expression that works in all contexts.
The safe zone: confident and friendly. A slight smile, forward-facing eyes, and an alert posture. Avoid extreme expressions like wide-open mouths (looks aggressive up close with children), closed eyes (looks sleepy or disengaged), or teeth-baring grins (can frighten younger students).
The logo can have multiple expression variations for different uses—fierce for athletics, friendly for enrollment materials. But the costume gets one shot, so the design must establish a “default” expression early that the costume will replicate.
6. Structural Symmetry
Asymmetrical designs create major costume construction challenges. A character holding a prop in one hand, a head tilted at an angle, or a body turned three-quarters all require the costume to favor one side—making it look odd from the “wrong” angle during live performances.
Design the mascot in a symmetrical, front-facing stance as the primary pose. This is the pose the costume will replicate. Asymmetrical action poses can exist as secondary logo variations for print and digital, but the core design that informs the costume must be balanced.
This also affects weight distribution. A costume head that is heavier on one side (because of an asymmetrical horn, crest, or hairstyle) creates neck strain for the performer and limits how long they can wear the suit.
7. Buildable Anatomy
Some design elements are extremely difficult or impossible to build as wearable costumes:
- Wings that extend beyond arm width — restrict movement and doorway access
- Long tails that drag — trip hazard, get stepped on, collect dirt
- Thin protruding elements (antlers, long beaks, antennae) — break easily, poke people
- Flowing hair or manes below shoulder level — tangle, look matted after one use
- Feet larger than 2x shoe size — performer cannot walk safely
A costume-ready design accounts for these constraints from the start. The hawk’s wings become a cape-like back element rather than extended arms. The unicorn’s horn is shortened and reinforced. The lion’s mane is structured rather than flowing.
These are not compromises—they are smart design decisions that make the character work better in every format. A compact, well-proportioned mascot is more recognizable, more durable, and more versatile than one designed without physical constraints in mind.
The Design-to-Costume Handoff: What Your File Package Needs
When a mascot design is ready for costume production, the builder needs more than a logo file. Here is what a complete handoff package includes:
Required Specifications
Character Turnaround Sheet — The mascot drawn from front, side (left), three-quarter, and back views. This is non-negotiable. A costume builder working from a single front-facing logo has to guess what the back of the head looks like, how the tail attaches, and how side-profile features connect. Guessing means surprises.
Color Specification Document — Every color defined with Pantone (PMS) values, not just hex codes. Screen colors do not translate to fabric. A Pantone reference ensures the costume builder, the spirit wear vendor, and the signage company all match. Include fabric swatch recommendations if possible.
Scale Reference — The design annotated with proportional measurements. Head is X% of total height. Eyes are X% of head width. Mouth opening is X inches minimum for performer visibility. These numbers prevent the builder from interpreting proportions differently than intended.
Expression Guide — The intended expression annotated with notes: “Slight confident smile, eyebrows at neutral-to-alert angle, eyes focused forward.” This prevents the sculptor from adding personality that was not in the design—an overly aggressive scowl, a goofy grin, or dead-looking eyes.
Material Intent Notes — Guidance on intended surface textures. “Body fur should be short-pile plush, not shaggy. Head should be smooth painted foam, not furry. Belly panel is a contrasting smooth fabric.” Without these notes, builders default to their preferences, which may not match your vision.
Optional But Valuable
- Action pose variations to show how the character moves (informs joint placement)
- Size comparison showing the mascot next to a 5’10” human figure
- Environment photos of where the costume will be used most (helps with material and visibility decisions)
- Logo lockup sheet showing how the 2D logo and 3D costume should relate visually
Common Mistakes We Fix
After 200+ projects, these are the problems we see most often when schools bring us designs created without costume consideration:
“The Logo Is Beautiful But Unbuildable”
A school hired an illustrator to create a photorealistic eagle mascot. The design won a local design award. It featured individually rendered feathers, realistic talons, anatomically accurate wing structure, and a piercing gaze with detailed iris patterns.
None of it could be built. The realistic proportions made the costume look like a person in a bird suit rather than a character. The individual feathers required hand-painting that would add $4,000 to production. The talons were a liability concern for student interactions.
We redesigned the character with the same personality and energy but with costume-buildable proportions, simplified feather groups instead of individual feathers, and friendly rounded talons. The school kept the detailed illustration for print materials and the simplified version became the costume and primary logo.
”We Designed the Logo Five Years Ago”
A school with an existing mascot logo from 2018 wanted a costume. The original designer was unavailable. No turnaround sheets existed. The logo was a three-quarter view with no indication of what the character looked like from other angles.
We had to reverse-engineer the character: creating front, side, and back views that were consistent with the existing logo while filling in details that were never defined. This added 3-4 weeks to the timeline. If the original design had included turnaround sheets, the costume could have gone straight to production.
Lesson: Always create the full character system at the logo stage, even if a costume is not planned yet. The turnaround sheets cost very little to produce during initial design but are extremely expensive to recreate later.
”The Colors Don’t Match Across Anything”
A school’s mascot appeared in slightly different colors on their website, gym floor, spirit wear, and building signage—because the original design only specified RGB values. Each vendor interpreted the colors for their medium, and the results drifted.
When the costume arrived, it was yet another variation. The blue was slightly different from every other blue in the building. The school now had five versions of “their” blue.
Lesson: Specify Pantone colors at the design stage. Every vendor in every medium references the same physical standard. One Pantone number, one color, everywhere.
The Right Way: Design Once, Build Everywhere
The approach that saves schools time, money, and frustration is integrated design—creating the mascot as a complete system from day one with every application considered before a single sketch is finalized.
Here is how the process works when done correctly:
Week 1-2: Discovery and Research. We learn about your school, your community, your athletic program, and your mascot’s personality. We also document the physical applications: Will there be a costume? Gym floor? Spirit wear? Building signage? Knowing the full scope upfront shapes every design decision.
Week 2-3: Concept Development. We create 3-6 mascot concepts. Each concept includes a primary logo view AND a simplified “costume-feasibility” sketch showing how the character would look as a 3D suit. The committee evaluates both simultaneously, not sequentially.
Week 3-4: Refinement. The chosen concept is developed into a complete character system: front view, side view, back view, expression guide, and color specifications. Every detail is checked against costume construction constraints, gym floor paint limitations, and spirit wear reproduction requirements.
Week 4-6: Final Artwork. Full vector files for every application. The logo package and the costume specification package are created together, ensuring perfect consistency. If the school proceeds with costume production, the builder receives a complete handoff package on day one—no guessing, no interpretation, no surprises.
This integrated approach typically saves schools $2,000-5,000 compared to the “design logo first, figure out costume later” approach, because there is no rework, no redesign, and no re-approval process.
Checklist: Is Your Mascot Design Costume-Ready?
Use this checklist before sending any mascot design to a costume builder:
- Silhouette test passed — Recognizable as a filled black shape at 1 inch
- Head proportion — 25-30% of total character height
- Color count — 6 or fewer solid colors, no gradients
- Detail scale — All details visible when printed at 8.5 x 11
- Expression — Confident and friendly, works in all contexts
- Symmetrical stance — Front-facing, balanced weight
- Buildable anatomy — No fragile protrusions, manageable wings/tail
- Turnaround sheets — Front, side, three-quarter, and back views
- Pantone colors — Every color specified with PMS values
- Scale reference — Proportional measurements annotated
- Material notes — Surface texture intent documented
- Expression guide — Written description of intended personality
If any of these are missing, address them before production begins. Fixing a design file takes hours. Fixing a built costume takes weeks and thousands of dollars.
The Bottom Line
The difference between a mascot that works everywhere and one that requires constant rework is not talent or budget—it is process. When the designer understands costume construction, gym floor limitations, and spirit wear reproduction from the start, the design naturally accounts for every constraint without sacrificing personality or impact.
Schools that invest in integrated mascot design—logo and costume specifications created together—get better results faster and at lower total cost than schools that treat the logo and costume as separate projects.
If you are planning a new mascot or considering a costume for an existing design, we can evaluate your current artwork for costume readiness and give you a clear picture of what is needed before production.
Is your mascot design costume-ready?
Send us your current mascot artwork and we’ll evaluate it against our costume-readiness checklist — free, no obligation. We’ll tell you exactly what’s needed before going to production.
We Build and Manufacture Mascot Costumes
A professionally built mascot costume creates unforgettable moments at games, rallies, and community events.
See Full Details →
Design to Delivery
We manage everything
6-12 Week Delivery
In time for your season
Safety First
Ventilation & visibility
Custom Projects
Professional quality
About Mash Bonigala

Mash Bonigala is the Founder & CEO of School Branding Agency. Over the past 15 years, he's helped 250+ K-12 schools transform their brand identity and drive enrollment growth. From charter schools to public districts, Mash specializes in creating mascot systems and brand strategies that rally communities, boost school spirit, and convert prospects into enrolled families. Schedule a Zoom call to discuss your school →
Mascot logo design
Get an enrollment-ready mascot your community loves
Start with our mascot logo design service. We’ll craft a distinctive, on‑brand mascot system and rollout plan tailored for your school.
Get a Free ConsultationRelated
Charter Application Branding - Professional Identity for Authorizer Approval
Professional charter application branding that demonstrates operational readiness to authorizers. Complete brand identity, website, and application materials. Charter-specific packages for charter schools.
View detailsRelated
Charter School Branding - Mascots & Identity (2025)
We help charter schools build mascots and identity systems that rally communities and support enrollment. See packages and proof.
View details